
- Sat Dec 02, 2017 4:57 pm
#72249
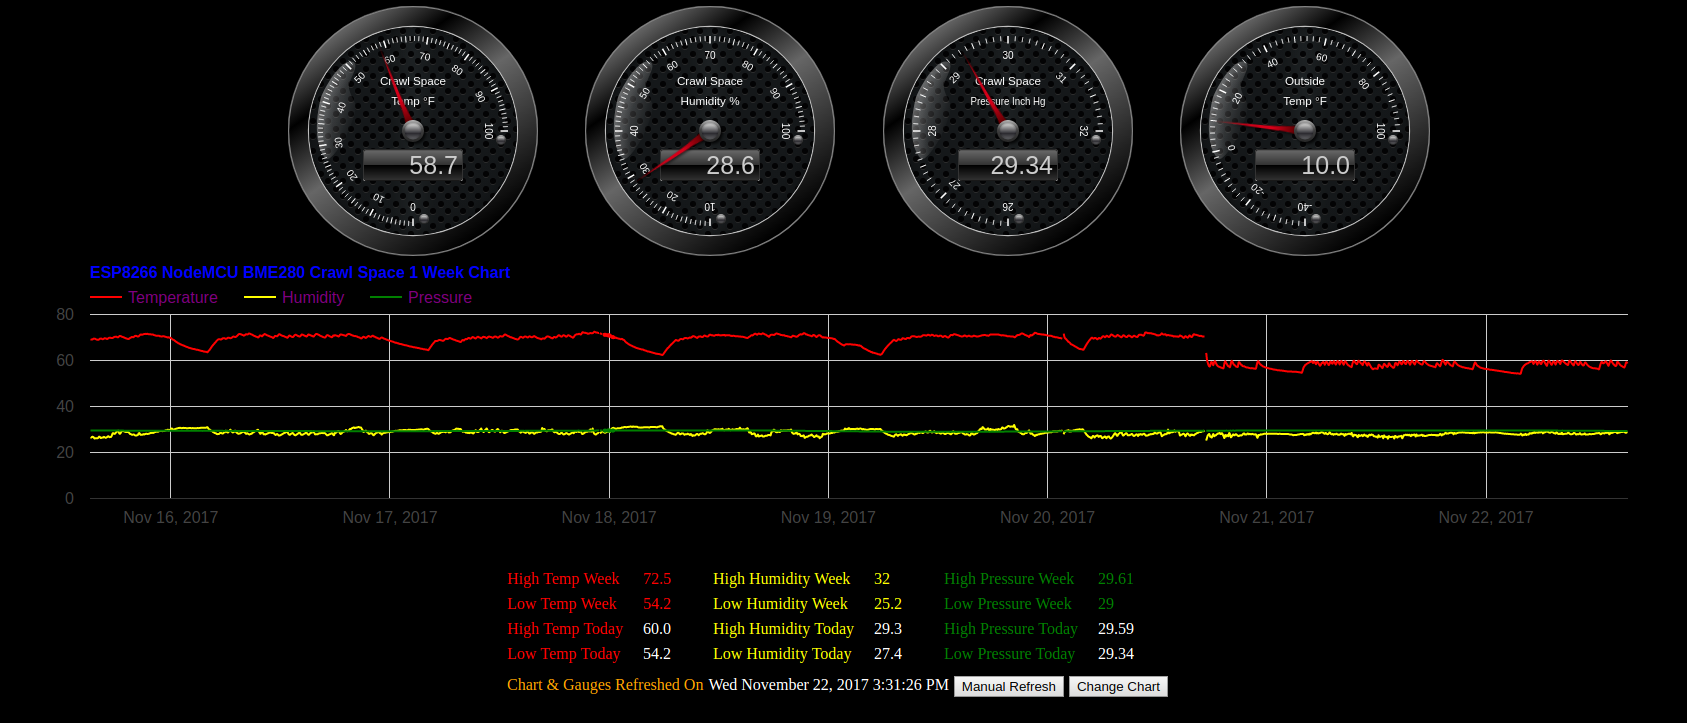
Fancy Gauges and Chart for your ESP8266 NodeMCU Development board with BME280 Temperature, Humidity and Pressure sensor. Thingspeak will store all your data in the cloud for retrieval at any time for years (hopefully) to come. The gauges and chart are populated from the data stored at thingspeak and are updated automatically every 5 minuets.
Needed Items:
ESP8266 NodeMCU Development board ($3.79 from Banggood.com Hong Kong)
Bosch BME280 ($5.63 from Banggood.com Hong Kong)
Breadboard Jumpers ($3.09 from Banggood.com Hong Kong)
Breadboard ($2.28 from Banggood.com Hong Kong)
Power Supply, Free if you have a micro USB phone charger
Micro USB cable, Free if you have one already
Arduino IDE, Free Download
Get the .ino & .HTML code files here https://github.com/optio50/ESP8266-Node ... ith-BME280
1. Create a free Thingspeak account and new channel at https://thingspeak.com , Call the channel "ESP8266-NodeMCU-12E-BME280"
2. The new channel should have 3 fields named Temperature Humidity Pressure in that specific order (Note First Letter capitalization).
3. Take note of your new "channel ID" XXXXXX under "Channel Settings"
4. Click the "API Keys" link and take note of your "API Write" and "Read API Keys" XXXXXXXXXXXXXXX. Also, make this a public channel under sharing.
5. Create a second Thingspeak channel that will hold the "Today" (since midnight) High Low data. Call it "BME280 Daily High Low Data"
6. This new channel should have 6 fields named Tmax Tmin Hmax Hmin Pmax Pmin in that specific order (Note First Letter capitalization).
7. Take note of the "BME280 Daily High Low Data" "channel ID" , "Read" & "Write API keys" just like in the above steps.
8. Follow the instructions for installing the Arduino IDE & ESP8266 core at http://easy-esp.com/getting-started-with-easyesp-...
9. Fire up the Arduino IDE so we can install the four libraries we will need.
10. You will need the "Adafruit Unified Sensor Driver" library, install it in the "Library Manager" in Arduino IDE. Menu Sketch --> Include Library --> Manage Libraries do a search by Type = "Recommended" Topic = "Sensors" then put the words Adafruit Unified Sensor Driver in the search box. The one you want says "Adafruit Unified Sensor Driver by Adafruit"
11. In addition, you will also require the "Adafruit BME280 Library" install it in the "Library Manager" in Arduino IDE. Menu Sketch --> Include Library --> Manage Libraries do a search by Type = "Recommended" Topic = "Sensors" then put the words Adafruit BME280 Library in the search box. The one you want says "Adafruit BME280 Library by Adafruit"
12. Another library you need is Wire.h , install it in the "Library Manager" in Arduino IDE. Menu, Sketch --> Include Library --> Manage Libraries Do a search by Type = "Contributed" Topic = "Signal Input/Output" then put the word Wire in the search box. The one you want says "Wire Built-in by Arduino" Most likely at the bottom of the selection.
13. One more library, ESP8266WiFi , install it in the "Library Manager" in Arduino IDE. Menu, Sketch --> Include Library --> Manage Libraries Do a search by Type = "Contributed" Topic = "Communication" then put the word ESP8266wifi in the search box. The one you want says "ESP8266wifi Built-in by Ivan Grokhotkov"
14. The I2C address for BME280 is hardcoded in the Adafruit_BME280.h file (look for the line #define BME280_ADDRESS 0x77) inside the Adafruit_BME280_Library folder. Adafruit’s BME sensor modules are hard-wired to use the I2C address of 0x77. But the BME280 can have a slightly different I2C address (0x76) if its external SDO pin is grounded. If you are using the sensor modules from a third party, it is likely that it’s address would not match with the default value in the Adafruit library. For example, for most of the BME280 sensor modules available on eBay or Aliexpress have their I2C address to be 0x76. If you dont get a response from the sensor using the default address set in the Adafruit_BME280.h file, you might need to change it to 0x76.
BME280 & ESP8266 Connection Points. ESP8266 3.3V to BME280 Vin, ESP8266 GND to BME280 GND, ESP8266 D4 to BME280 SCL, ESP8266 D3 to BME280 SDA. 15. Open the provided ESP8266-NodeMCU-12E-BME280.html file in a text editor and enter your "ESP8266-NodeMCU-12E-BME280" (The first channel you created) "Channel ID" & "Read API Key" for the variables key1 & chan1. Also enter the "Read API Key" and "Channel ID" for "BME280 Daily High Low Data" (The second channel you created) for key2 and chan2. In addition, enter your timezone offset from UTC. As in -5 for me. All the values must be inside the provided single quotes 'XXXXX'. Save and exit the text editor.
15. Plug in your ESP8266 with the USB cable to your computer then select your serial port to be the USB port.
Linux users may have to change ownwership of the USB port to communicate with the /dev/ttyUSB0 as in 'sudo chown yourusername /dev/ttyUSB0' or what ever you selected as your port in setup.
16. Next we will program the ESP8266. Connect a USB cable between your ESP8266 and your computer.
Load the provided New_BME_Sensor.ino file into the Arduino IDE. Your BME280 sensor should be hooked to D3 (SDA) & D4 (SCL) on the ESP8266. Enter your "ESP8266-NodeMCU-12E-BME280" (The first channel you created) "Write Key" "Wireless SSID" & "Password" into the correct section of the sketch. Then click menu item "Sketch" & "Upload". After you upload the sketch (Progress reaches 100%) to your ESP8266 you can open the serial monitor (Icon top right looks like a magnifiying glass) and see your data print out after 5 Minutes, every 5 Minutes. The data gets sent to thingspeak at 5 min intervals so it will be some time before you have meaningful chart data but you should have gauge readings after 5 min.
Make sure you get a correct readings from the BME280 in the serial monitor.
The first measurement will likely be an invalid nan.
Wait a few minuets till the next reading and verify the readings look good.
17. Now, While the data is slowly uploading to thingspeak lets do some tweaking to get some additional data from whats being uploaded. Go back to the thingspeak website and in the Thingspeak "BME280 Daily High Low Data" channel page (The second channel you created) click the green "MATLAB Analysis" button. Select Template "Custom (No Starter Code)"
18. Name the MATLAB Analysis "Calculate Min Max Since Midnight".
19. Copy the MATLAB Analysis.txt code into the provided space. Enter the "channel ID" for "ESP8266-NodeMCU-12E-BME280" (The first channel you created) into "readChannelID". Enter the "BME280 Daily High Low Data" (The second channel you created) Write "Channel ID" & "Write Key" into writeNewChannelID & writeAPIKey respectivly. I know it sounds confusing (read it again). Click save and run. If you did it correcty and the read channel is public you will see no errors and it successfully prints the values. Note, You may see an error if no data has been uploaded to that channel yet. Despite the error continue. If desired you can revisit Click save and run to make sure it works once data has been uploaded.
20. Next, we need to create a "Time Control" to fire this code every 5 min and our data gets written to the channel "BME280 Daily High Low Data" (The second channel you created). From the main page of "BME280 Daily High Low Data" (The second channel you created) select Apps at the top. Under actions select "TimeControl" then the Green button "New TimeControl". Name it "Send High Low Temps ESP8266". Select your time zone if needed and select "Recurring" under Frequency. Select Minute under Recurrence. Set to run every 5 Minutes. Action should be MATLAB Analysis and "Code to Execute" is "Calculate Min Max Since Midnight". Save TimeControl.
Edit the HTML files and look for comments that say "******** Change Me 1 of 8 *********" Change these to your preference.
Notes:
Some of the text fields and the weekly chart will not populate correctly until you have a full day and full week of data for the 24 Hr and Week section and chart.
Once you have a bunch of data you can zoom in on the charts with the mouse wheel (Right Click to Reset). You can also have a fourth gauge (as seen in the screenshots) from another sensor from another channel but I have commeted out the relevant portions. If you feel savy, hook it up. There is also some timing issues to be aware of. You likely will not have the absolute most current data but it should always be less than 5 Minutes old. This comes from when the timing control gets fired, When the data was sent from the ESP8266 and when you loaded / refreshed the web page.
Open the provided ESP8266-NodeMCU-12E-BME280.html file in your web browser and you should see the gauges and chart populated.
Get the .ino & .HTML code files here https://github.com/optio50/ESP8266-Node ... ith-BME280


