
- Tue Feb 18, 2020 1:20 am
#85713
https://github.com/khoih-prog/Blynk_WM
You can install directly from Arduino Library Manager
https://www.ardu-badge.com/Blynk_WiFiManager
To help you to eliminate `hardcoding` your Wifi and Blynk credentials for ESP8266 and ESP32 (with / wwithout SSL), and updating/reflashing every time when you need to change them.
With version `v1.0.7` or later, you now can configure:
1. `Multiple WiFi Credentials (SSID, Password) and system will autoconnect to the best and available WiFi SSID.`
2. `Multiple Blynk Credentials (Server, Token) and system will autoconnect to the available Blynk Servers.`
With version `v1.0.5` or later, you now can configure:
1. `Config Portal Static IP address, Name and Password.`
2. `Static IP address, Gateway, Subnet Mask and 2 DNS Servers IP addresses.`
So, how it works?
If it cannot connect to the Blynk server in 30 seconds, it will switch to `Configuration Mode`. You will see your built-in LED turned ON. In `Configuration Mode`, it starts an access point called `ESP_xxxxxx`. Connect to it using password `MyESP_xxxxxx` .
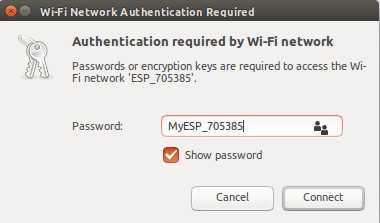
After you connected, please, go to http://192.168.4.1.
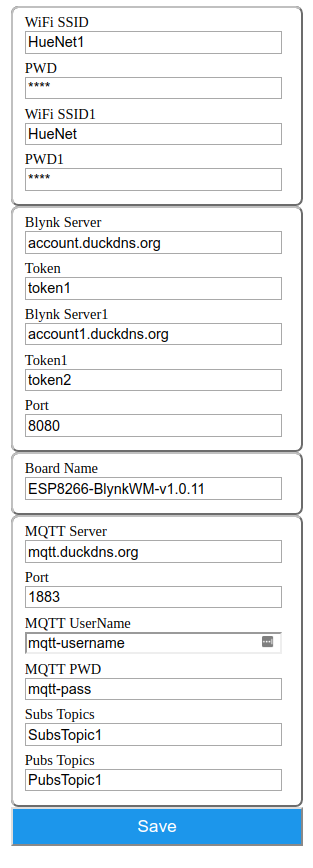
Enter your credentials, then click `Save`. After you restarted, you will see your built-in LED turned OFF. That means, it connected to your Blynk server successfully.
This is the link to Blynk
http://docs.blynk.cc
Blynk was designed for the Internet of Things. It can control hardware remotely, it can display sensor data, it can store data, visualize it and do many other cool things.

You can install and use Local Blynk Server (RPi Zero W, 3B+, 4, Laptop, PC, etc) to have full control.
The Server source code is in Public Domain and written in Java. You can download, compile and use to be sure having full control.
Use Local Blynk Server
Blynk Server
Blynk Server Source Code
You can install directly from Arduino Library Manager
https://www.ardu-badge.com/Blynk_WiFiManager
To help you to eliminate `hardcoding` your Wifi and Blynk credentials for ESP8266 and ESP32 (with / wwithout SSL), and updating/reflashing every time when you need to change them.
With version `v1.0.7` or later, you now can configure:
1. `Multiple WiFi Credentials (SSID, Password) and system will autoconnect to the best and available WiFi SSID.`
2. `Multiple Blynk Credentials (Server, Token) and system will autoconnect to the available Blynk Servers.`
With version `v1.0.5` or later, you now can configure:
1. `Config Portal Static IP address, Name and Password.`
2. `Static IP address, Gateway, Subnet Mask and 2 DNS Servers IP addresses.`
So, how it works?
If it cannot connect to the Blynk server in 30 seconds, it will switch to `Configuration Mode`. You will see your built-in LED turned ON. In `Configuration Mode`, it starts an access point called `ESP_xxxxxx`. Connect to it using password `MyESP_xxxxxx` .
After you connected, please, go to http://192.168.4.1.
Enter your credentials, then click `Save`. After you restarted, you will see your built-in LED turned OFF. That means, it connected to your Blynk server successfully.
This is the link to Blynk
http://docs.blynk.cc
Blynk was designed for the Internet of Things. It can control hardware remotely, it can display sensor data, it can store data, visualize it and do many other cool things.
You can install and use Local Blynk Server (RPi Zero W, 3B+, 4, Laptop, PC, etc) to have full control.
The Server source code is in Public Domain and written in Java. You can download, compile and use to be sure having full control.
Use Local Blynk Server
Blynk Server
Blynk Server Source Code


