Downloading and installing the new Arduino IDE for ESP8266

Moderator: igrr

User avatar
By timi257
#50042 Hey,

first I got to say that I'm new to this community and I'm trying to get started with the ESP8266 the first time.

And right at the start I got a problem:
I tried to flash the example-codes onto the ESP, but it doesn't work:

I downloaded the newest Arduino IDE-Version and wired it up like in this picture: Image

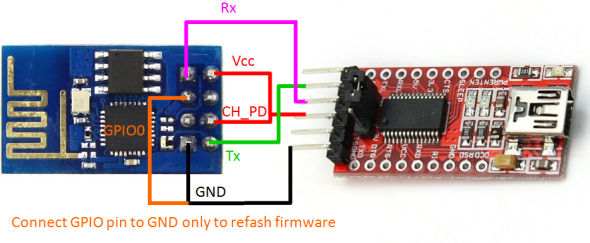
I changed my FTDI-Voltage to 3,3V and even "supported" it with 3,3V from an Arduino.
The red light on my ESP is on.

But when I want to flash something onto the Arduino I can't select the COM-Port it's connected to.
If I connect a Arduino to the port first and then the ESP and leave the Port the same it just says
Code: Select allerror: Failed to open COM7
error: espcomm_open failed
error: espcomm_upload_mem failed


So I guess it doesn't even "find" the ESP or something.

Does anyone have an idea what I could do to get it to work? :(
User avatar
By bobcroft
#50175 timi, the com port that is assigned to an Arduino could be entirely different to the com port assigned to your USB/FTDI device. Therefore because the Arduino is com 7 it does not mean the USB adapter will be and since the ESP downloader can't find com 7 it obviously is not on com 7.
If you are using Windows you can look under device manager to find what com ports have been allocated and you should see the FTDI device. Additionally in the Arduino IDE you should be able to look under 'ports' and see what com ports are available. In the same IDE, under boards, you should be able to see the generic ESP8266 option and this must be selected.
You also need to check that you have the Tx - Rx connections the correct way round, a few generic FTDI clones or copies are wrongly labelled and so you have to connect Tx - Tx, Rx- Rx on these devices.
Make sure GPIO is pulled to gnd, CH_PD and GPIO 2 are pulled to 3.3 volt (Vcc) preferably via 10K resistors.
Cycle the power and the ESP should go into 'flash' mode.
Some of the older ESP variants had different baud rates so you could try 9600, 57600 and 115200.

Finally ensure that you have a good power supply for the ESP8266, a solid 3.3 volt at 300 mA+. Poor power supplies are the cause of a lot of beginner problems

I do not have an 01 version to try myself. The newer ESP8266012E or F versions are much better as they are much more versatile. Also a Wemos D1 mini can be bought for about $4 and these just require the a mini USB cable to be plugged in to program them.
User avatar
By timi257
#50402 Hello, thanks for your answer! :)

I now bought an USB-Programmer for the ESP8266. Now the COM Port is found, so I guess the problem was the current.
But now if I want to flash something on the ESP8266 that I can now select within the Arduino-IDE I get the following errors:
Code: Select allerror: failed reading byte
warning: espcomm_send_command: cant receive slip payload data
warning: espcomm_sync failed
error: espcomm_open failed
error: espcomm_upload_mem failed


I chose:
Board: "Generic ESP8266 Module"
Flashmode: "DIO"
Flash Frequency: "40MHz"
CPU Frequency: "80MHz"
Flash Size: "512k (64 SPIFFS)"
Reset Method: "ck"
Upload Speed: "115200"

Also if I try to send "AT" over the Serial Monitor within the Arduino IDE, I only can read "AT" in there, so I don't get any response or anything..
Do you know what this problem could be?

Thanks for your answer again!