**This is an old revision of the document!**
Table of Contents
ESP8266 Windows Compiler Setups
Visual Studio IDE
This document will allow you to develop native 'C' firmware applications for the ESP8266 using Windows. You can setup your development environment using Microsoft DevStudio IDE. Using the accompanying serial terminal and flash writer application, you will be able to edit compile, link, flash and run without ever needing to leave the IDE.
Connecting the board
The ESP8266 runs on 3.3V and is NOT 5V TOLERANT, so you cannot just connect it to an Arduino. As the chip can draw up to 300mA when transmitting, you will need a good power supply. If in doubt, use a large capacitor (>100uf) to regulate the supply, near the chip. Failure to do so will result in instability.
Since the firmware is uploaded through the serial interface, you will typically use a USB to serial adapter. Here is the one I use:
Make sure you get one that works at 3V or with a 3V/5V switch, like this one.
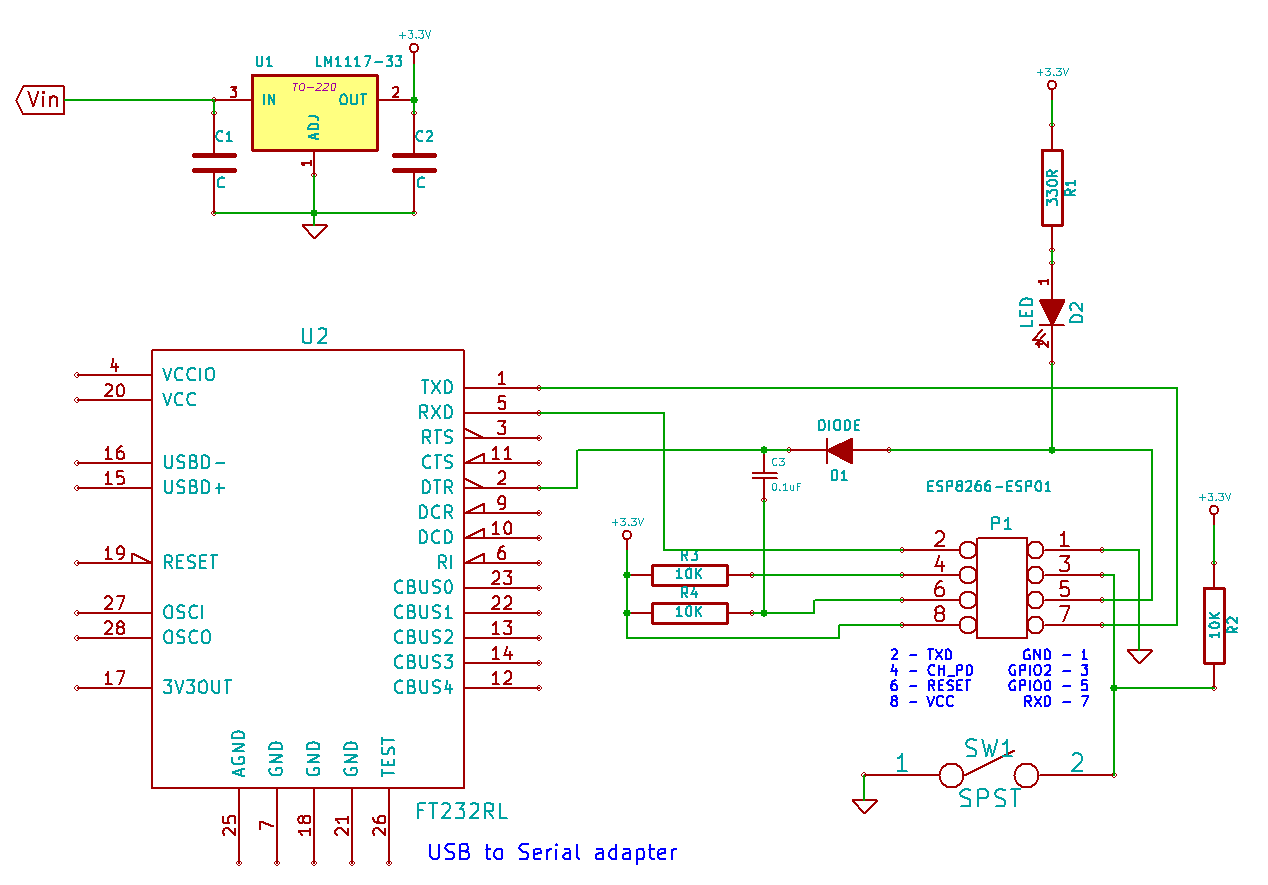 ESP-01 Hardware connections
To get the chip into firmware update mode, the chip needs to be reset while GPIO0 is held low and GPIO2 is held high. The above circuit uses the USB-serial adapter's DTR line to pull GPIO0 low and reset the chip via a small capacitor. GPIO0 needs to be held down for about 15ms after reset for the chip to go into firmware update mode. After that, GPIO0 needs to be released, as the bootloader then reconfigures GPIO0 as an output. All of this is handled automatically by the flash tool.
Toolset installation
The following lists all the software components I have gathered in order to create and upload firmware for the ESP8266. Most of these components have been supplied by other hobbyists and are subject to change or move. Even the official SDKs supplied by Espressif seem to evolve rather quickly.
This particular version of the toolset is designed to work under Windows 7 or 8, 32 or 64bit.
Here is a step by step guide:
- Create a directory to put all your ESP stuff in. I put mine in E:\ESP8266, but obviously yours will be different.
- Get Python 2.7X. Install it where you want. I put it in E:\Python27.
- You need PySerial.
- Get minGW. In the package manager, choose mingw-developer-toolkit and mingw-base. This will give you make.exe and some important utilities, like mkdir.exe that the makefiles will need.
- Get the sdk. Install it under your chosen directory. Mine is in E:\ESP8266\espiotrtossdk-master. * Download the missing libraries for the SDK: FreeRTOS libraries for SDK. Add them to the E:\ESP8266\espiotrtos_sdk-master\lib directory. * Get the pre-built compiler. Stick it in your chosen directory. Mine is in E:\ESP8266\xtensa-lx106-elf. * Get the missing xtensa includes for gcc here. It is the file xtensa.tar.bz2. Extract them into the compiler subdirectory: E:\ESP8266\xtensa-lx106-elf\xtensa-lx106-elf\include. * Get the source code for the xPL example project. Install it into a directory under your chosen project directory. Mine are in E:\ESP8266\Apps\xPL-ESP8266. * Now you need to correctly setup your path. You can of course add things to your global user path, but I like to setup a separate command prompt for things like this. I created a file called Vars.cmd, that sets up the path for working with the ESP toolset:
@echo off
PATH=%PATH%;E:\ESP8266\xtensa-lx106-elf\bin;E:\MinGW\bin;E:\MinGW\msys\1.0\bin * Then I setup a desktop shortcut for a command prompt:%comspec% /k E:\ESP8266\VARS.cmd. When I click this I get a command prompt with the proper path already set. * For the same reason, I also created a batch file that sets up the path before calling make:
@echo off
call E:\ESP8266\vars.cmd
make %1 %2 %3 %4 %5
* So in my project setup, in Visual Studio, I use ESPMAKE instead of make. * Modify the makefile in the xPLESP8266 project so that it reflects your locations for the tools and sdk. You should be able to compile and flash by simply typing 'make' or 'make flash' in the xPLESP8266 directory. * Get the enhanced serial terminal and firmware tool. You need the modified Python tool to flash the chip, esptool-py.py. This version is enhanced to reset the chip and bring it into firmware update mode automatically by using DTR. It also connects to Termie, the serial terminal application to share the serial port connection. * Compile 'Termie' the serial terminal. I modified this program to use a named pipe to communicate with the esptool-py flasher application. Thus it knows when to disconnect from the serial port when you want to flash the chip. * You can use Visual Studio as your development IDE, by adding your project as a C++ Makefile project. I have included sample project files. You need to modify the project properties to setup your make command and add the include directories in the configuration so that intellisense can show you function definitions in the editor. I recommend that you get the free Visual Studio 2013 community edition. ==== About the example project, xPL-ESP8266 ==== This project is designed using xPL, a protocol for Home Automation devices and systems. I used the FreeRTOS based SDK, as I believe it will be more flexible for most users. The program uses UDP to send and receive xPL messages. I used an ESP-01 variant, since it has two available GPIOs, GPIO0 and GPIO2. Although these GPIOs are used during the boot process, with some care, they can be used by applications. The application currently does two things: * Responds to xPL X10.BASIC ON and OFF commands, on a user-defined address, to turn on or off GPIO0. I have connected this to a LED for easy confirmation. * Generates an xPL X10.BASIC trigger command based on the state of GPIO2. Grounding GPIO2 generates an ON trigger, releasing it generates an OFF trigger. ====Things to watch out for==== You cannot use most of the standard 'C' libraries, as they are not compatible with the runtime. The sdk does provide many common functions, like 'printf', 'memcpy', and similar, but I had to scrounge the Internets to get source code to some missing functions, like 'sscanf', 'strlcpy'. Since every task created with FreeRTOS has it's own stack, the size of these needs to be managed carefully. Although the ESP8266 has plenty of RAM when compared to most microcontrollers, it is easy to run out of stack, or free memory. For this reason, I have usedmalloc()for many larger structures that would be otherwise declared on the stack in other environments. By default, all code goes into iram, which is only 32k, so it is easy to overflow that segment by linking in a bunch of stuff from the libraries or from your own code. Use ICACHEFLASHATTR on your functions to make sure they go into irom instead. Irom resides off-chip on a 4M flash ROM, thus leaving about 240-440kB for applications. Although the final compiled program appears huge (about 180k in irom, and 28k in iram), most of this is library code that runs the Wifi and IP stacks. The actual user application is something like 8k. The hardware design shown above also assumes that the switch will remain open at bootup, as GPIO2 needs to be high for the chip to boot normally. ===== Eclipse IDE ===== Looks like this is the best lead for that at this moment: Eclipse IDE for ESP8266 ======Arduino IDE ===== Go to Arduino site and download the IDE Unzip it wherever Go to the ESP8266 libraries and follow the easy install Lots of programms for you to try http://www.arduino.cc/en/Main/Software https://github.com/esp8266/Arduino