start-with-esp-12-arduino
**This is an old revision of the document!**
Table of Contents
Start with the ESP-12 and the Arduino tools
Hardware
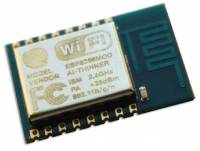
- ESP-12E module depending on module type additional wiring with resistors may vary. A few resistors have to be added to module 12E. On modules on next generation 12S or newer resistors may be on board or if the withe breakout board (http://thethingofinternets.com/?p=4) is used two resistors are on the board.
- 12E needs:
- one 10k resistor from GPIO to GND,
- one 10k from EN (or labeled CH_PD) to VCC,
- one 10k from GPIO0 to VCC,
- one 4k7 from RST to GPIO16.
- 3.3V power supply or supply from adapter
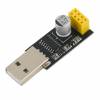
- USB-serial adapter ( ESP8266 ESP Serial WiFi Adaptor Module CH340G Driver ) this one has swish for programming on board. USB zu (ESP8266 seriell Adapter ESP01 Programmierer ESP UART Arduino) also can be used is nearly the same sure others also will work, just make sure the have a lever changer on board.
- If programming swish is missing one has to add the two jumpers or the switch.
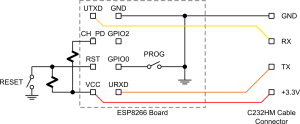
- Connect adapter
- RXD from adapter to TX on ESP12E and
- TXD from adapter to RX on ESP12E,
- GND to GND and
- VCC 3.3V to VCC 3.3V of ESP12E if supply from the adapter is in use or an external 3.3V supply.
- Additional Capacitors should also be added for more stability. 1nF plus 1000uF aluminium electrolytic capacitor proved to be best.
- To use programming switch and reset switch from the adapter one also has to connect this two wires from adapter to the ESP12E.
Software
Setup an start test program blink
- Connect Hardware as shown in description Hardware on top here.
- Plugin Adapter to USB and check in Windows with Hardware manager that the added COM port ist working. And verify the COM“XX” it is using.
- Install Arduino form “https://www.arduino.cc/en/Main/Donate”
- Open in Arduino “File” → “Preferences” window and add in an additional Board Manager URL: http://arduino.esp8266.com/versions/2.3.0/package_esp8266com_index.json
- Type in “esp8266” and select the correct chip in the popup window.
* Open in Arduino “Tools” → Board:“xxxxxxx” Board manager window and find Board name is “NodeMCU 1.0 (ESP-12E Module)“ - Open in Arduino “Tools” → PORT:“xxx” the port your Adapter is on.
- Open in Arduino “File” → “Examples” and find → Examples for “NodeMCU 1.0 (ESP-12E Module)” → and then “ESP8266” → then”BlinkWithoutDelay” Example.
- Turn on the program swish on on the board or an the adapter.
- In Arduino push the upload (Blue error →) and wait until 100% is reached. While uploading the blue LED on the board is flashing.
- Turn on the program swish off on the board or an the adapter.
- Push reset on the Board or an the Adapter. Maybe a additional power of an on is also needed.
- Now the on board Led should be flashing.
start-with-esp-12-arduino.1521830037.txt.gz · Last modified: 2018/03/23 18:33 by jpascher


